
Summary
Using open source tools like Ollama and Claude Code to build an on-premises AI coding assistant can help you keep code private, control costs, and improve uptime.


In this installment of our how-to series on AI, we’ll go over the steps to implement a code assistant. The benefits of running a locally maintained environment include:
- Data privacy: Code and sensitive data remain within your network
- Cost control: No per-token pricing or API limits
- Uptime: No impact due to internet or service interruptions
To showcase this AI use case we will create two configurations, the first being a “laptop friendly” approach, the second providing the first steps towards an enterprise style implementation, “basic client server”.
Configuration 1 – “laptop friendly”
Prerequisites
For our first configuration, we will use an Ubuntu machine with an NVIDIA GPU to serve the model and run the code assistants. The GPU driver versions installed are:
- NVIDIA-SMI 570.195.03
- Driver version: 570.195.03
- CUDA version: 12.8
Model Serving with Ollama
To serve our model(s), we’ll use Ollama. This is a well-maintained and stable choice for our setup. We run the installation command:
|
1 2 3 4 5 6 7 8 9 10 11 12 13 14 15 16 17 18 19 20 21 22 23 |
curl –fsSL https://ollama.com/install.sh | sh >>> Installing ollama to /usr/local >>> Downloading ollama–linux–amd64.tar.zst ######################################################################## 100.0% >>> Adding ollama user to render group... >>> Adding ollama user to video group... >>> Adding current user to ollama group... >>> Creating ollama systemd service... >>> Enabling and starting ollama service... >>> NVIDIA GPU installed. ollama —version ollama version is 0.14.2 |
See Ollama’s documentation for the complete Linux installation steps.
With Ollama installed, we can now download the required model(s) to serve. The available models are listed on the Ollama website.
Considering our coding assistant use case, here are some possible choices. This is not an exhaustive list; the selected model depends on use case and available hardware. Before selecting a model, be sure to review its open source license to determine whether your planned usage is in compliance.
- CodeLlama 34B, size 19GB: Good for advanced code completion, debugging, and refactoring
- Deepseek-Coder 33B, size 18GB: Good for multi-language support, algorithm implementation, code optimization
- Mistral 7B Instruct, size 4.1GB: Good for low memory usage, fast inference, excellent instruction following
- Llama 3.1 70B, size 40GB: Good for advanced reasoning, system design, complex problem-solving
- Qwen3-coder:30b, size 19GB: Good for multi-language support, code translation, debugging
As an example, we’ll download qwen3-coder:30b and test a simple query. To download it, run the following:
|
1 2 3 4 5 6 7 8 9 10 11 12 13 14 15 16 17 18 19 20 21 22 23 24 25 26 27 28 29 30 31 32 33 34 35 36 37 |
ollama pull qwen3–coder:30b pulling manifest pulling 1194192cf2a1: 100% ███████████████████▏ 18 GB pulling d18a5cc71b84: 100% ███████████████████▏ 11 KB pulling 69aa441ea44f: 100% ███████████████████▏ 148 B pulling 24a94682582c: 100% ███████████████████▏ 542 B verifying sha256 digest writing manifest success To test it, run the following: curl https://localhost:11434/api/chat -d ‘{ “model”: “qwen3-coder:30b”, “messages”: [{ “role”: “user”, “content”: “Hello there!” }], “stream”: false }‘ {“model”:”qwen3-coder:30b”,”created_at”:”2026-01-21T11:51:54.438727162Z”,”message”:{“role”:”assistant”,”content”:”Hello! It’s nice to meet you! How can I help you today?“},”done“:true,”done_reason“:”stop“,”total_duration“:9181278118,”load_duration“:9055392006,”prompt_eval_count“:11,”prompt_eval_duration“:21552567,”eval_count“:17,”eval_duration”:86360546 |
Coding Assistant – Claude Code
Several coding assistants exist, for our “desktop friendly” configuration we provide the steps for Claude code from Anthropic. Claude code has local Ollama model support since v0.14.0.
As per the installation instructions, run:
|
1 |
curl –fsSL https://claude.ai/install.sh | bash |
To connect Ollama, add the relevant environment variables to use the Ollama service:
|
1 2 3 |
export ANTHROPIC_AUTH_TOKEN=ollama export ANTHROPIC_BASE_URL=https://localhost:11434 |
Then, we can start Claude Code by specifying the model to use.
|
1 2 3 4 5 6 7 8 9 10 11 12 13 14 15 16 17 18 19 20 21 22 |
claude —model gpt–oss:20bb ╭─── Claude Code v2.0.61 ─────────────────────────────────────────────────────────────────────────────────╮ │ │ Tips for getting started │ │ │ Run /init to create a CLAUDE.md file with instructions for Claude │ │ │ ───────────────────────────────────────────────────────────────── │ │ ▐▛███▜▌ │ Recent activity │ │ ▝▜█████▛▘ │ No recent activity │ │ ▘▘ ▝▝ │ │ │ │ │ │ gpt–oss:20b · API Usage Billing │ │ │ ~/ │ │ ╰─────────────────────────────────────────────────────────────────────────────────────────────────────────╯ /model to try Opus 4.5 > check for errors in the natsdebug.sh script ∴ Thought for 11s (ctrl+o to show thinking) Below is a line‑by‑line review of your natsdebug.sh script. I’ve highlighted syntax errors, missing commands, and potential runtime pitfalls. After each section, I provide a concise fix or explanation. . . . This version addresses all syntax and flag‑usage problems while keeping the script’s intent intact. |
For Claude code to work correctly the selected model must have the “tools” capability. If not, the following error will occur:
|
1 |
⎿ API Error: 400 {“type”:“error”,“error”:{“type”:“invalid_request_error”,“message”:“registry.ollama.ai/library/codellama:34b does not support tools”},“request_id”:“req_441621ab8bf054b6ba750280”} |
You can check the tools capability of a model using the following curl command. Here are the outputs against three models:
|
1 2 3 4 5 6 7 8 9 10 11 |
curl https://localhost:11434/api/show -d ‘{“name”: “gpt-oss:20b”}’ | jq ‘.capabilities’ [ “completion”, “tools”, “thinking” ] |
Note: If the model does not have the thinking capability, it will fail to read local files. If working with Claude Code on a code repository, this is a “nice-to-have” feature.
| Model | Thinking | Tools | Completion |
| qwen3-coder:30b | X | X | |
| qwen3:32b | X | X | X |
| gpt-oss:20b | X | X | X |
| codellama:34b | X | ||
| deepseek-r1:32b | X | X | |
| deepseek-coder-v2:16b | X | ||
| deepseek-coder:33b | X |
Configuration 2 – “basic client server”
Prerequisites
For our second configuration, we will use an NVIDIA DGX Spark to serve the model. The DGX Spark is running as a server (not desktop mode). The GPU driver versions installed are:
- NVIDIA-SMI 580.126.09
- Driver version: 580.126.09
- CUDA version: 13.0
Our model serving endpoint will be accessible remotely allowing us to run the coding assistant from any system on the network.
Model Serving with VLLM
To serve our model(s), with a production orientated implementation we will use VLLM running within a docker container. NVIDIA provides maintained containers for the VLLM image, refer to the latest versions documentation for more information.
Models for VLLM are pulled from Hugging face, we will be serving Qwen3-Coder-Next-FP8
From our DGX Spark terminal we start the VLLM container using the following command. In addition to the model parameter (MODEL_NAME), we also specify the context size here set to 32k (MAX_MODEL_LEN), as well as a local volume (-v /mnt/hfCache…) to cache the model(s) files and avoid downloading on each container restart.
|
1 2 3 4 5 6 7 8 9 10 11 12 13 14 15 16 17 18 19 20 21 22 |
sudo docker run —gpus all \ –d \ –v /mnt/hfCache:/root/.cache/huggingface \ –p 8000:8000 \ –e MODEL_NAME=Qwen/Qwen3–Coder–Next–FP8 \ –e TENSOR_PARALLEL_SIZE=1 \ –e MAX_MODEL_LEN=32768 \ –e GPU_MEMORY_UTIL=0.85 \ —name vllm–server \ nvcr.io/nvidia/vllm:26.01–py3 \ bash –c ‘python3 -m vllm.entrypoints.openai.api_server \ –model “$MODEL_NAME” \ –enable-auto-tool-choice \ –tool-call-parser qwen3_coder \ –trust-remote-code \ –attention-backend flashinfer \ –enable-prefix-caching \ –tensor-parallel-size $TENSOR_PARALLEL_SIZE \ –max-model-len $MAX_MODEL_LEN \ –gpu-memory-utilization $GPU_MEMORY_UTIL \ –host 0.0.0.0 \ –port 8000′ |
Check that the VLLM server has started up and is ready to receive queries:
|
1 2 |
sudo docker logs vllm–server (APIServer pid=128) INFO: Application startup complete. |
Run a test query against the endpoint to validate the service, change the IP address and port to those of your running VLLM server:
|
1 2 3 4 5 6 7 8 9 10 11 12 13 |
curl –X ‘POST’ ‘https://192.168.1.23:8000/v1/chat/completions’ \ –H ‘accept: application/json’ \ –H ‘Content-Type: application/json’ \ –d ‘{ “model”: “Qwen/Qwen3-Coder-Next-FP8”, “messages”: [ { “role”: “user”, “content”: “Hello there!” } ] }’ {“id”:“chatcmpl-a3458ec7196cba70”,“object”:“chat.completion”,“created”:1770372905,“model”:“Qwen/Qwen3-Coder-Next-FP8”,“choices”:[{“index”:0,“message”:{“role”:“assistant”,“content”:“Hi there! 😊 How can I help you today? Is there something specific you would like to know?”,“refusal”:null,“annotations”:null,“audio”:null,“function_call”:null,“tool_calls”:[],“reasoning”:null,“reasoning_content”:null},“logprobs”:null,“finish_reason”:“stop”,“stop_reason”:null,“token_ids”:null}],“service_tier”:null,“system_fingerprint”:null,“usage”:{“prompt_tokens”:11,“total_tokens”:34,“completion_tokens”:23,“prompt_tokens_details”:null},“prompt_logprobs”:null,“prompt_token_ids”:null,“kv_transfer_params”:null} |
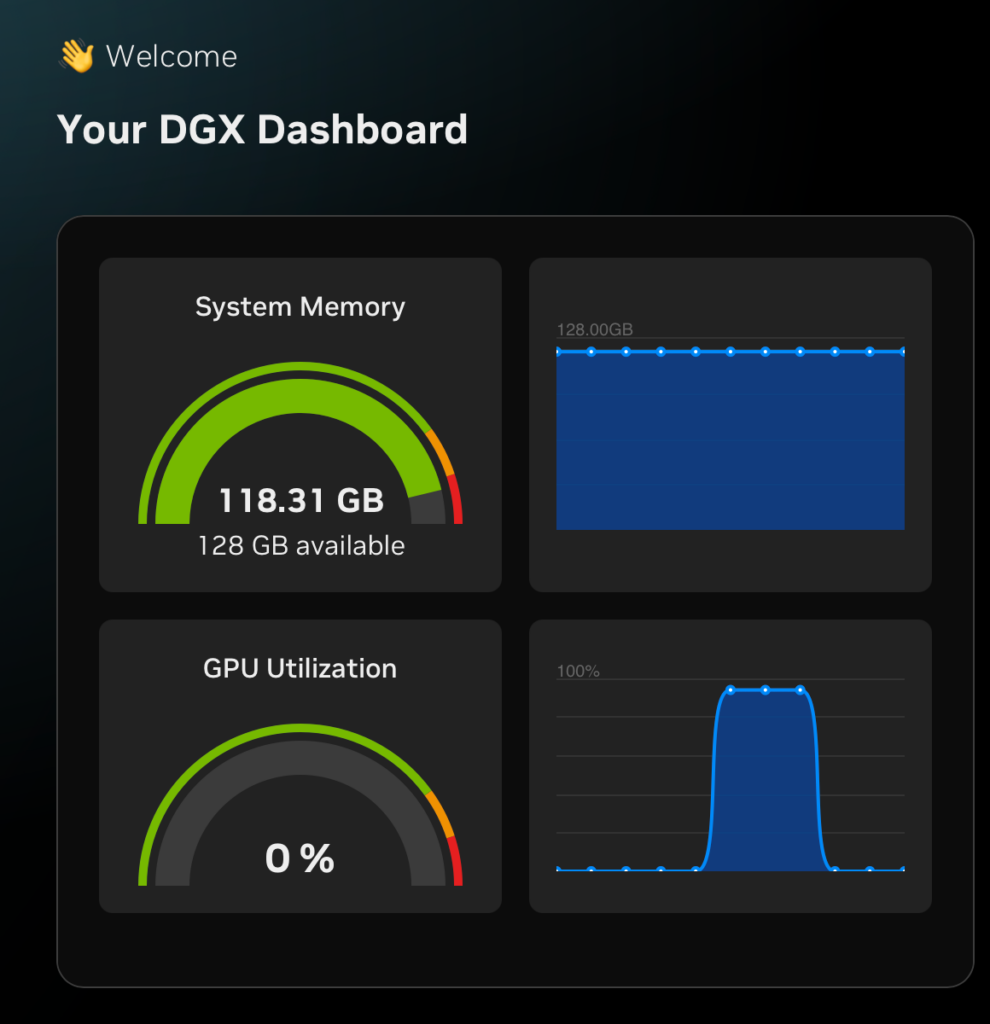
Within the DGX Spark dashboard we can observe the GPU utilization from the memory allocated to the loaded model to the compute cycles during the above query:
Coding Assistant – Opencode
For our “basic client server” configuration we will use the opensource opencode assistant.
As per the instructions, on our development system we install the opencode utility (there is also a beta desktop application):
|
1 |
curl –fsSL https://opencode.ai/install | bash |
Then add the VLLM server to the opencode config file, make sure to change IP address and port: to those of your VLLM endpoints:
|
1 2 3 4 5 6 7 8 9 10 11 12 13 14 15 16 17 18 19 20 |
vi ~/.config/opencode/opencode.json { “$schema”: “https://opencode.ai/config.json”, “model”: “spark/Qwen/Qwen3-Coder-Next-FP8”, “provider”: { “spark”: { “npm”: “@ai-sdk/openai-compatible”, “name”: “DGX Spark vLLM”, “options”: { “baseURL”: “https://192.168.1.23:8000/v1” }, “models”: { “Qwen/Qwen3-Coder-Next-FP8”: { “name”: “Qwen3-Coder-Next FP8”, “tools”: true } } } } } |
We can now run the code assistant:
|
1 |
opencode |
Our queries will be processed by the model running on the remote DGX Spark.

This “basic client server” configuration allows multiple users to leverage a shared serving endpoint to perform AI assisted code generation.
Conclusion
There can be many reasons to look for alternatives to cloud-based AI solutions, such as costs, data sovereignty, uptime, model capabilities, and output control, to name a few. You may think that implementing such a solution is time-consuming, complex, and not worth the hassle, but as shown in this article, it’s far easier than you might expect.
Scale Your On‑Prem AI Coding Assistant
Take the next step with a deeper dive into how to architect the storage, GPU, and data pipeline behind it so you can keep code private, control costs, and maintain uptime as you grow.