Summary
This article is Part 2 in a series that looks at NFS on VMware. It offers a step-by-step guide on how to set up NFS on FlashArray.


Welcome to the exciting world of NFS on Everpure® FlashArray™ for VMware! Since we went deep into the divisive history of block vs. NFS for VMware in our first blog, “From Bitter Rivals to Best Friends: The Evolution of NFS and Block for VMware,” it’s now time to dive into the fun stuff: getting down to the basics of setting up NFS on your FlashArray.
Assumptions before we begin:
- File services are already enabled on your FlashArray.
- Your networking is already configured and ready to roll.
- You’re rocking Purity release 6.8.7 (or newer!).
Step 1: Crafting Your NFS Export Policy
First things first, let’s talk policies. The default nfs-simple policy is okay, but it only does NFSv3 and squashes root to an anonymous UID/GID. For VMware, we want something more robust.
Let’s create a shiny new policy called nfs-vmware that supports both NFSv3 and NFSv4.1, and—crucially for VMware—doesn’t squash root!
- Navigate to Storage > Policies.

- Click Add Export Policy.
- In the wizard, name your policy nfs-vmware.
- Make sure it’s Enabled and the type is set to NFS.

Now, let’s add some rules to make this policy VMware-friendly:
- Click the Add Rule button.

- For simplicity, we’ll keep it straightforward:
- Enable no-root-squash. This is essential for VMware!
- Leave the client set to * to allow any client to connect. (You can tighten this up with specific subnets or hostnames if your DNS is perfectly configured.)
- Set access to rw (read/write).
- Enable both NFSv3 and NFSv4.1. While vSphere 8u1 was the first to officially support NFSv4.1, it’s good to be prepared! (We’ll explore Kerberos for NFSv4.1 security another time.)

- Ensure the policy is enabled!

Step 2: Creating Filesystems and Managed Directories
Now that we’ve defined how we’re going to export our VMware datastores, let’s create the actual filesystems and some handy managed directories.
- Navigate to Storage > File Systems.
- Click Create File System.

- We’re creating a top-level filesystem here to serve as the parent for our VMware datastores, allowing for better organization and management.
- Let’s call it vmwaredatastores for simplicity.

Now, let’s talk about managed directories—they’re awesome! They allow you to create distinct export points within a single filesystem, making it easy to manage different workloads or access types.
- Click on your newly created vmwaredatastores filesystem.
- Click Create Directory.

- Create a directory called importantvms. This is where your most critical VMs will live. Set the path to /important. This will come in handy later when we explore the Everpure plugin.
- Click Create.


Let’s create another directory for your ISOs and images. This can be super helpful if you want to manage your files and images from a Windows workstation via SMB, while still allowing your ESXi hosts NFS access. If you’re a Content Library guru, you can skip this!
- Click Create Directory again.
- Name it isos_and_images.
- Set its path to /images.

- Click Create.
Step 3: Exporting Your Shares
Now that our directories are created, let’s export them.
- Under “Directory Exports,” click the plus button. This will launch the “Create Exports” wizard.

- Select your importantvms directory.

- Now, pick your freshly minted nfs-vmware policy to export it.

- Click Create. Success!

Let’s repeat the process for our isos_and_images directory, but this time, we’re also going to add the smb-simple policy. This is the magic trick that lets you connect to the same share via both NFS and SMB protocols!
- Click the plus button again under “Directory Exports.”
- Select your isos_and_images directory.
- Select both the nfs-vmware policy and the smb-simple policy.

- Click Create.
Once you’re done, you should see three directories (root, importantvms, and isos_and_images) and three exports: two NFS and one SMB. Looking good!
Lastly, before we mount our newly minted share, let’s ensure we have Autodir enabled on our managed directory. Autodir gives us more performance and capacity visibility when enabled (we’ll cover this more in our next blog).
- Navigate back to Storage and find the Policies section.
- Under this new view, click on the plus icon in the Autodir Policies section.
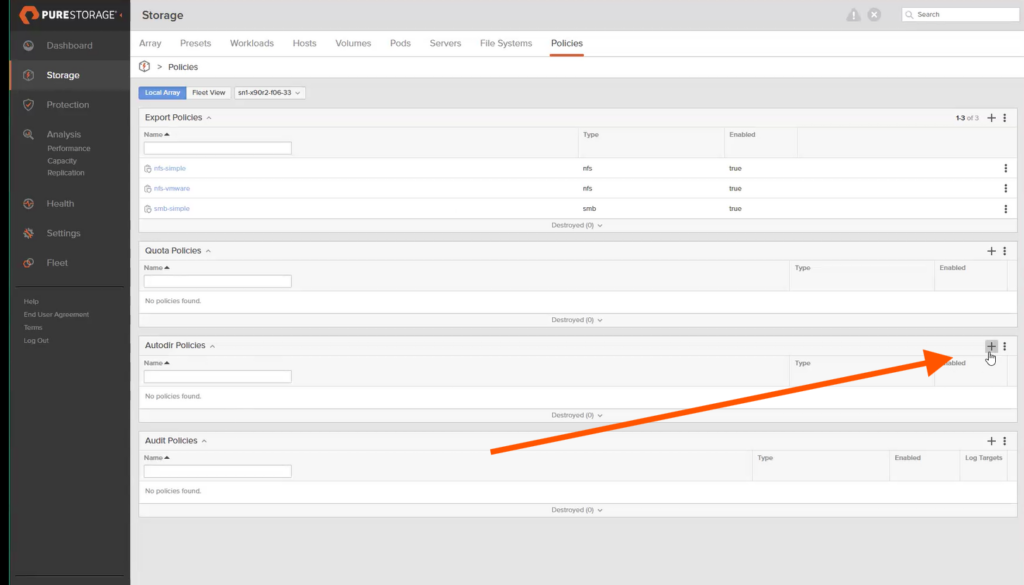
- Name the new policy, make sure it is enabled, and click Save.
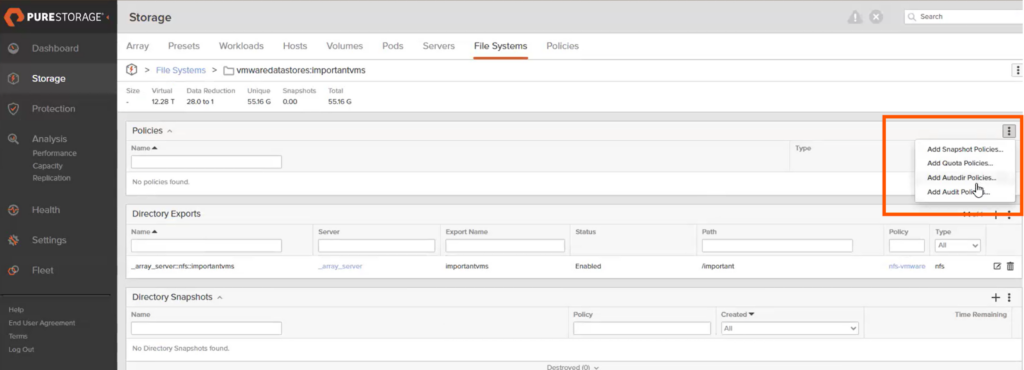
- Now go back to our managed directory importantvms, and under the first Policies box, click the three dots and then Add Autodir Policies.
Lastly, before we mount our newly minted share, let’s ensure we have Autodir enabled on our managed directory. Autodir gives us more performance and capacity visibility when enabled (we’ll cover this more in our next blog).
- Navigate back to Storage and find the Policies section.
- Under this new view, click on the plus icon in the Autodir Policies section.

- Name the new policy, make sure it is enabled, and click Save.
- Now go back to our managed directory importantvms, and under the first Policies box, click the three dots and then Add Autodir Policies.

- Click on our new Autodir policies and click Save.

Step 4: Adding Your Datastore to VMware vSphere
Now for the moment of truth! Let’s jump over to your vSphere client and add our shiny new datastore.
- Right-click your cluster and navigate to Storage > New Datastore.

- In the wizard, select NFS.

- We’ll use NFS 4.1 since our hosts support it. (Stay tuned for a future deep dive on NFS multipathing.)

- Click Next.
Now, let’s define our share parameters:
- Enter the hostname or IP address of your FlashArray file VIF (Virtual Interface). If you’re unsure how to find this, consult your FlashArray networking configuration. You can also consult the networking best practices here (Pure1® login required).
- Crucially, click the “Add” button after you enter the VIF. You should see it listed under “Servers to be added.”

- For now, we’ll skip Kerberos, but expect a follow-up soon.

- Click Next.
Next, let’s select where we want to mount this datastore. Generally, you’ll want to mount it to every host in the cluster for maximum flexibility.
- Select the top checkbox to select all hosts.

- Click Next.
Finally, review the summary screen. If everything looks good, click Finish!

And there you have it! A nice, happy 65,536TB datastore! Perhaps that’s a bit more space than you initially intended. Let’s rein that in with a quota policy.

Step 5: Implementing a Quota Policy
Let’s put a sensible size limit on that datastore.
- Go back to your FlashArray and navigate to Storage > Policies.

- Add a new quota policy called vmware-datastore-quota.
- Make sure it’s Enabled.

Now, let’s open up our new policy to create some rules.

- Click on your vmware-datastore-quota policy.
- Click Create Rule.

- Let’s make this 20TiB and make sure Enforced is turned on.

- Click Create.
You’ve now got a policy rule set up to enforce a 20TiB limit on whatever it’s attached to. Now, let’s attach it.

- Under “Members,” click the three dots and select Add Member.

- For this quota, we really only want to select our importantvms directory.

- Click Add and review the summary.

Step 6: Rescan Storage in VMware
Almost there! Now, let’s tell vCenter about our new quota.
- Go back to your vCenter host.
- Right-click a cluster object and navigate to Storage > Rescan Storage.

- After waiting patiently, you’ll now see that your importantvms share is happily down to a much more reasonable 20T in size.

At this point, you’re ready to create some awesome VMs on your perfectly configured datastore.

Join the Everpure Community
Network with storage peers and get your Everpure product questions answered.
FAQ
What is NFS and why is it used?
NFS (Network File System) is a protocol that allows multiple clients to access and share files over a network, making it useful for distributed environments where centralized file access is required.
How does NFS compare to other file protocols?
NFS is a stateful file protocol optimized for shared access and interoperability, while other protocols like SMB or object storage (S3) have different performance and use-case profiles based on platform and workload characteristics.
What are the key components of NFS on a FlashArray?
On FlashArray, NFS consists of file systems, exports, and access control mechanisms, all built on top of highly efficient block storage that delivers performance and resilience for file workloads.
How does FlashArray handle NFS performance and scalability?
FlashArray uses a highly parallel architecture and underlying optimized storage engine to deliver consistent low latency and high throughput for NFS clients, enabling both small file and large dataset performance.
What is an NFS export and how is it configured?
An NFS export is a configured file system share that a server presents to clients. Administrators define export paths and access permissions based on client requirements.
How does NFS handle access control and permissions?
NFS uses standard UNIX file permissions and host-based access controls to manage client access, allowing administrators to define who can read, write, or execute files.
What are common use cases for NFS on FlashArray?
Common use cases include virtualization, backup repositories, application file shares, home directories, and any workload that benefits from shared file access with enterprise performance and efficiency.
Can NFS on FlashArray support mixed workloads?
Yes. FlashArray’s architecture is designed to support mixed file and block workloads with predictable performance and consistent service levels.
Go Deeper into VMware Integration
See how FlashArray file services integrate with VMware to automate NFS datastores, snapshots, and per‑VM performance visibility.